How many times have you been asked to install Oracle Database on a new machine? If you are like most administrators it comes all too often. Not only do we get requests for new installs to support new projects or hardware upgrades we also frequently install Oracle Database for our own pet projects and tests. Installing the Oracle Database and applying the patches required can be a very time consuming processing not to mention error prone. And it only gets worse if the number of installs increase. You could spend an entire day if not longer installing and patching multiple Oracle Database installations.
Oracle Enterprise Manager 11gR1 Grid Control allows administrators to create pre-configured Oracle Database installation images that can be used for database provisioning. Database provisioning using Enterprise Manager 11gR1 Grid Control significantly reduces the time required to install new Oracle Database installations and virtually eliminates the errors. This ability allows the administrators to handle database provisioning in an automated manner thus freeing the administrator to perform other business critical tasks.
Licensing Notice: Using Oracle Enterprise Manager Grid Control (10g and 11g) to deploy software and patches requires a license for the Database Provisioning and Patch Automation Pack for patching, Configuration Management Pack for Oracle Database and the Configuration Management Pack for Applications if you wish to deploy other application.
This document assumes that The Software Library has already been configured. If you need instructions on configuring The Software Library take a look at the post Configuring the Software Library for Oracle Enterprise Manager 11gR1 Grid Control. It is also assumed that you have a host with an existing Oracle Database install that that can be reached via Oracle Enterprise Manager Grid Control.
The following steps will detail how to create an Oracle Database Provisioning Component based off an existing Oracle Database Install.
Note: If you are using Oracle Enterprise Linux 5 (or RHEL 5) or greater you will see this error. The compress utility has been deprecated in favor of gzip and starting with version 5 it is not installed by default. You will need to install the ncompress rpm on the host containing the Oracle Home before attempting these steps.
Let’s get started by clicking on the Deployments tab.
On the Deployments page click on the Provision link.
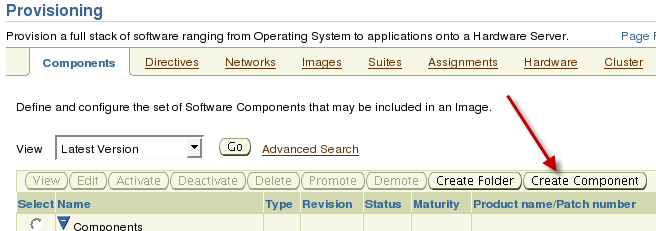
The Components section of the Provisioning page is where we all of the components in the Software Library are listed and where we will create our component. Click the Create Component button.
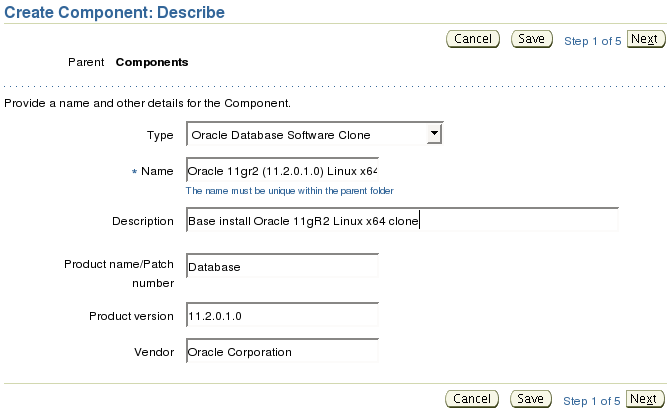
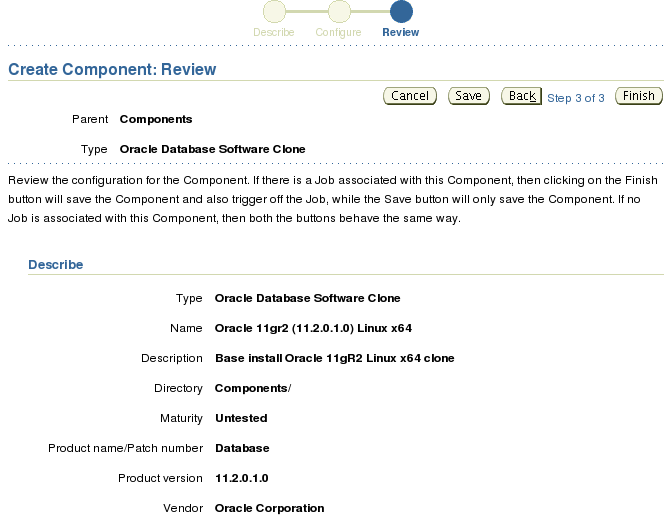
In the first part of creating the component will are asked to provide information about the component. Select Oracle Database Software Clone from the Type drop down. The only required field is the Name which must be unique in parent folder. The parent folder in this case is Components. The other fields provide more details about the component but are entirely optional. After filling out the fields click the Next button to continue.
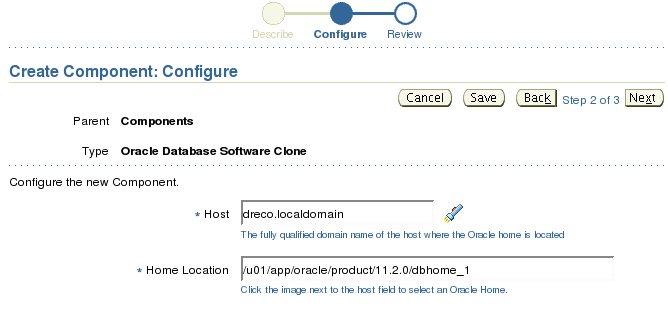
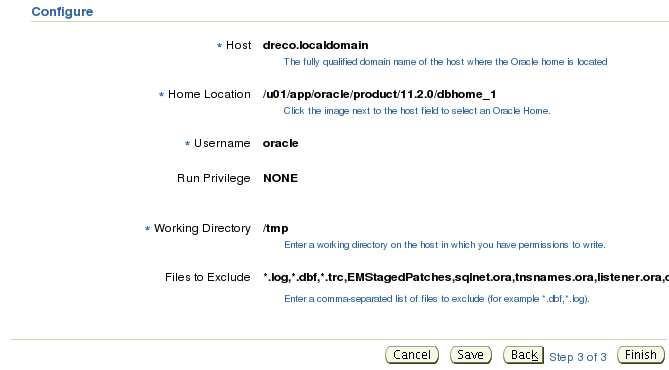
Next we provide the information on host that contains the home in which to use for clone image. Click the flashlight to the right of the Host field to select the host. Once the host has been selected the home location should be populated.
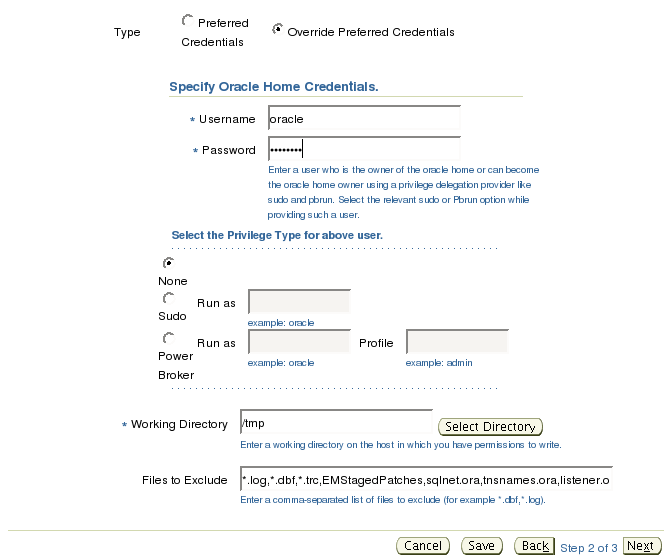
Grid Control also needs host credentials to perform several of the steps required to create the clone. Provide a host OS user name and password. For the working directory the make sure that the host OS user provided can access the directory and that there is at least 2.5 to 3 times the size of the Oracle Home available.
The Files to Exclude field is pre-populated with files and file extensions to exclude from the clone. If you have other exclusions add them the end of the of the comma separated list. After filling out the form click the Next button to continue.
The next page is the Review page for the Create Component. The top half of the page contains information provided in the first page to describe the component.
The second half of the page details the information we provided for host that contains the Oracle Database Home to clone.
Click the Finish button to create the component and to start the job to create the clone of the Oracle Home and add it to the Software Library.
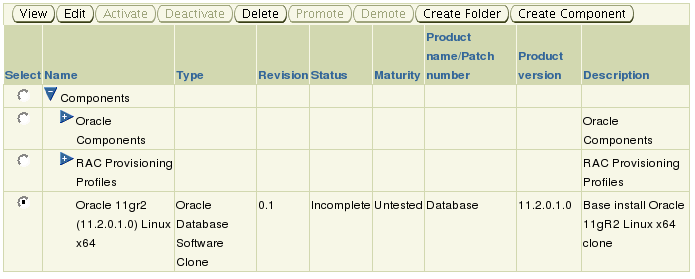
After clicking the Finish button you will be taken back to the Component section of the Provisioning page. Note that there is a confirmation message that has link to the job to create the clone image.
In the component section you will see the component. Note that the new component has a Status of Incomplete. The Status will remain incomplete until the Job to create the cloned home image is complete.
Click on the Job execution ID link provided in the Confirmation message to go to the job Summary page.
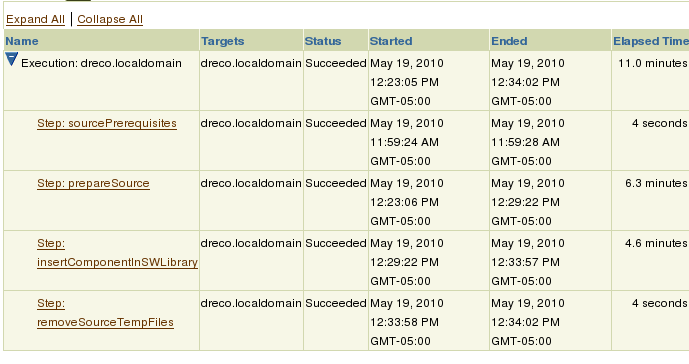
The Summary page will detail the steps taken to create the clone image. You can click on the links to get detailed information on what was done during each step.
After several minutes the image will be complete. Go back to Deployments->Provisioning-Components page and you will now see that the status for our component is ready.
We now have a component we can use to for database provisioning. Deploying this component will save time as binaries will not need to be linked and any and all patched applied to the home prior to the clone will be included.
In the next post I will detail how to use what we have done in this post to deploy the image to a new host.


