The term user by its self leaves much to interpretation as to the type of user. In Enterprise Manager the concept of a user must be thought of as an Administrator but that still leaves plenty of room for interpretation. What type of Administrator? Is it a database administrator, a systems administrator, a web administrator? The answer to that question is it depends.
The type of Administrator depends on the privileges and roles assigned to the Administrator. It is fair to say that an Administrator that has privileges that allow access to and administration of web servers is a Web Administrator. If there are common privileges among all Web Administrators you can add them Web Administrators role.
This document will introduce you to the privileges provided in Oracle Enterprise Manager 11gR1 as it walks through the creation of roles for the database administrator of the proddb database.
Creating a Role
A role is a collection of privileges that are common to a specific function that can be granted to administrators or other roles. For example privileges that would be common among all database administrators could be assigned to a role called EM_DBA. The EM_DBA role could then be granted to all of the administrators that perform database administration duties instead of granting each administrator each individual privilege. So lets get started in creating a role.
Click the Setup link at the top right hand side of the page.
Click the Roles link to enter the Role page.
On the Roles page you can manage the roles you have defined in Enterprise Manager.
Enterprise Manager has one role by default called PUBLIC. The PUBLIC role is automatically assigned to all new administrators with the exception super administrators.
The intention of the PUBLIC role is to be assigned privileges that are common among all non super administrator administrators. By default the PUBLIC role as no privileges assigned and can be deleted if not needed.
Click the Create button to start role creation process. The first step of role creation is to provide a name and description. While the description is optional the name is not. The name can only contain alphanumeric and .@#_- characters. After providing the name click the Next button to continue.
Next we can assign any roles we wish to this new role. At this time the only role that exists is PUBLIC and it does not show because it will automatically be granted to non super administrators. Click the Next button to continue.
Next we get to assign the privileges to this role.
Privileges in Oracle Enterprise Manager 11gR1 Grid Control are divided into three categories: System, Target and Object Privileges. In this document we will only be working with System and Target Privileges.
System Privileges
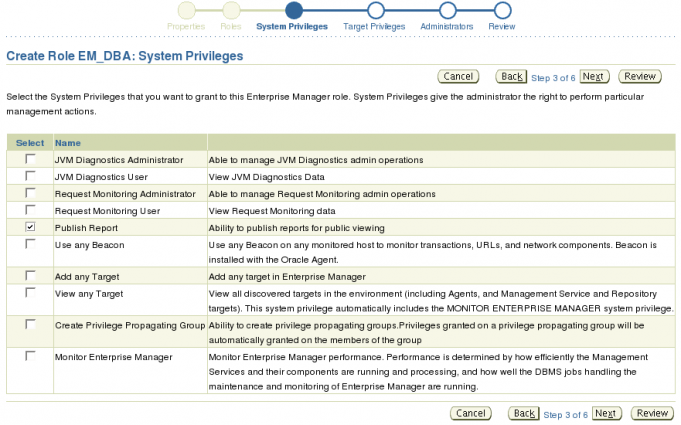
All of the System Privileges provided by Enterprise Manager are displayed on the System Privileges selection screen along with descriptions.
Keep in mind what function the role is to provide in your organization when deciding which system privileges to add to the role. In this example we are creating a database administrator role and in my organization the only system privilege that makes sense is the Publish Report privilege. Make your selections and click the Next button to continue.
Target Privileges
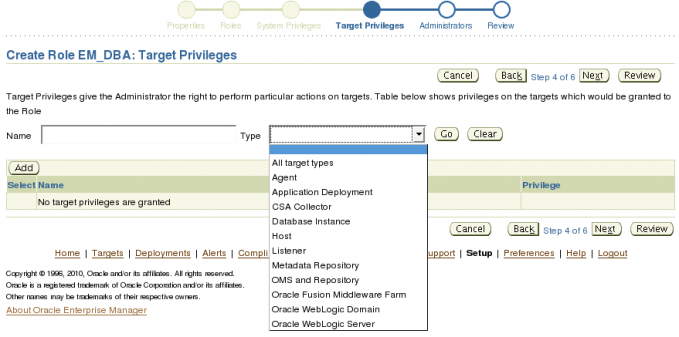
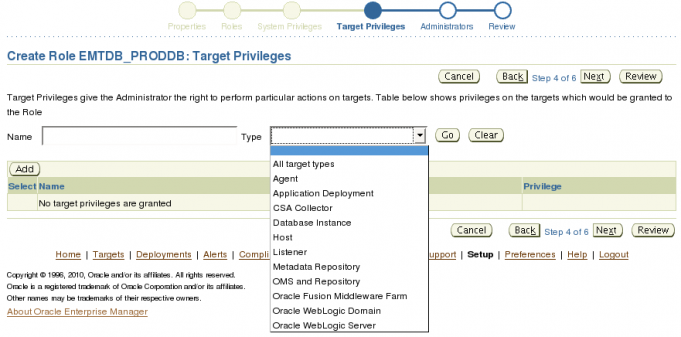
Next we can assign Target Privileges to the role. In this section we can set privileges on specific target to role. If the target is not explicitly added then the role has no privileges for that target.
Roles can have both System and Target privileges. In some cases it might either make sense or be easier to administer privileges if System and Target privileges were split among multiple roles.
For example, we are making a role to be assigned to all database administrators. Would it make sense to assign target privileges to one or more databases? What if your organization has policies in place that state only specific administrators can have access to the HR databases? In cases like access to the HR database it makes sense to have a separate role with target privileges for HR databases.
In this example we will create another role for the target privileges. After making your selections click the Next button to continue.
Next we can assign administrators to this new role.
At this time no administrators are defined in the system so we can click the Next button to continue.
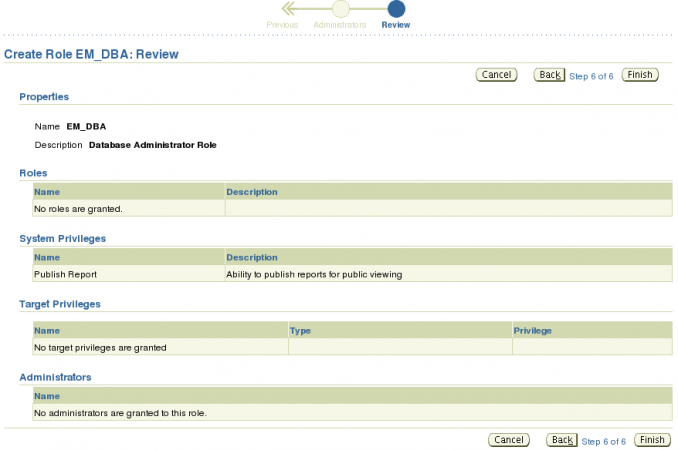
We are now presented with Review page.
On this page you can review selections made for this role. If you find that you need to either add or remove something, now is the time to click the Back button to go back to the page you need change. If there are no changes click the Finish button to create the role.
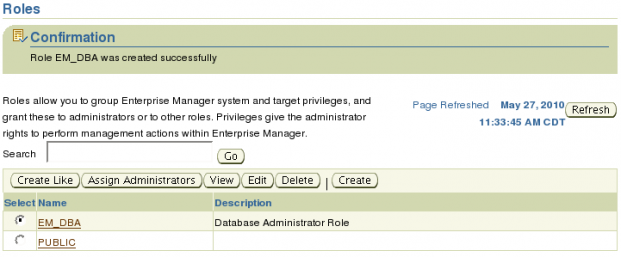
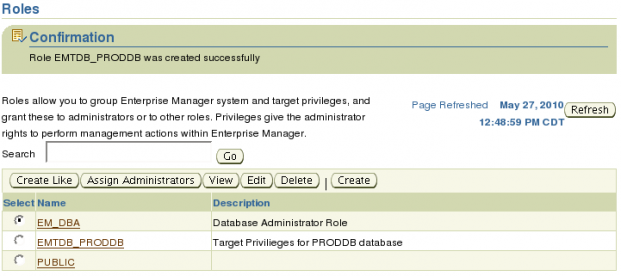
After the role has been created you will be taken back to the Roles page and you should see the Confirmation message and the new role.
We know have a Database Administrator role, but we are not done yet. Remember we set out to create role for the database administrator of the proddb database? The EM_DBA role created has no Target privilege so currently administrators assigned this role have no privileges on any targets.
So next we will create a role for the proddb database. Click the Create button to start.
On the Properties page I provided a name and a description.
I used the EMTDB_PRODDB as the name for the role. EMTDB in my organization signifies a role for Target privileges for a DataBase. For this role we are not going to assign any roles or system privileges. We are going straight to the Target Privileges. Click the Next button until you get to the Target Privileges Page.
Target Privileges Continued…
Like System privileges it helps to keep in mind the function this role will provide. Here we are making role that will be used to monitor and manage the proddb database. Given that we can see that the following types of targets make sense for this role: Database Instance, Host, Listener and Agent. Click the Add to button to start.
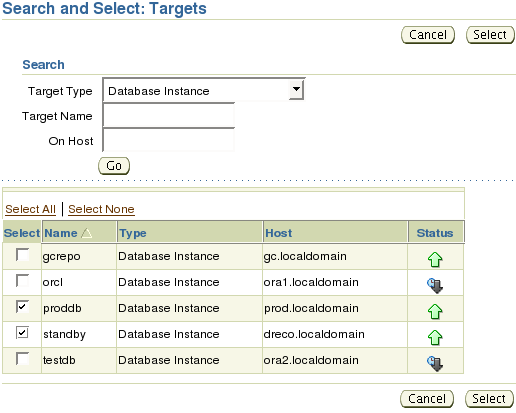
When you click the Add button a pop up window will appear. Change the Target Type to Database Instance and click the Go button.
Next select the database and note the host in which the database resides. In this example proddb has a Data Guard instance called standby so both where selected.
Make your selection and click the Select button to continue.
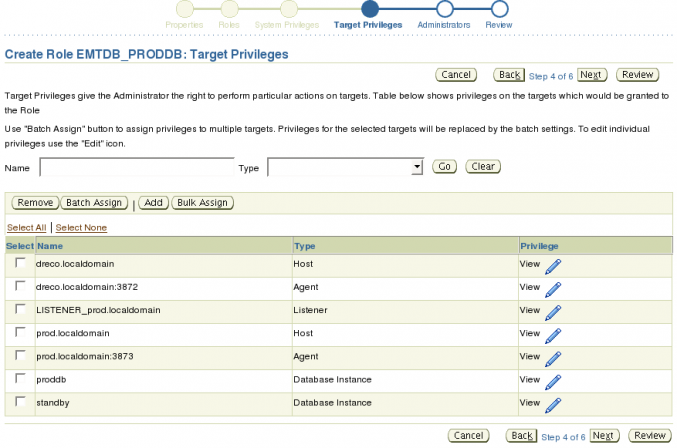
Continue adding the host, listener, and agent targets for this role.
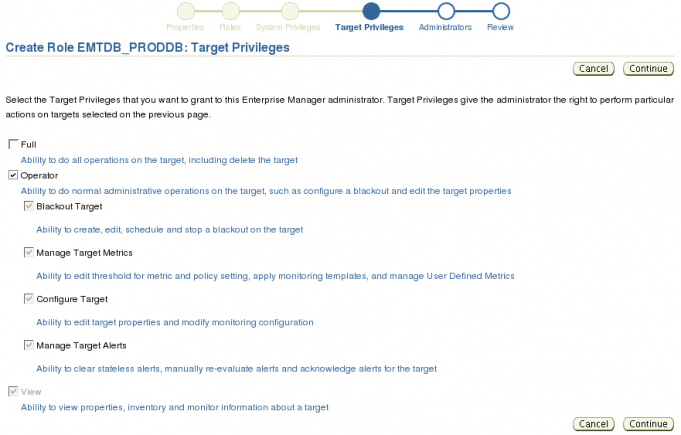
Now that we have all of the targets all that is left are to assign appropriate privileges. There are two ways this can be done, either individually or by bulk. If you are going to assign the same privileges for each target the Bulk Assign is the way to go. However, if there are some targets that need to have different privileges then you will need to assign the privileges individually. In this example the role is going to have the same privileges on all targets so click the Bulk Assign button.
The Target Privileges page displays all of the target privileges provided by Enterprise Manager. Some items to note: the View privilege cannot be removed. If you assign a target to a role then members of the role will be able to view that target. Selecting Operator selects all options underneath Operator. You need to be aware of this because members of this role can change metric thresholds and edit the target properties and monitoring configuration. If your organization has a group that is responsible setting and enforcing monitoring and configuration policies you might want to think carefully about assigning the Manage Target Metrics Configure Target privileges. After making your selections click the Continue button.
After assigning the appropriate target privileges you will be taken back the Target Privileges page.
If you have been following along you should note that the Privilege column has been updated to reflect the assigned privileges.
Click the Review button to go to the Review Page.
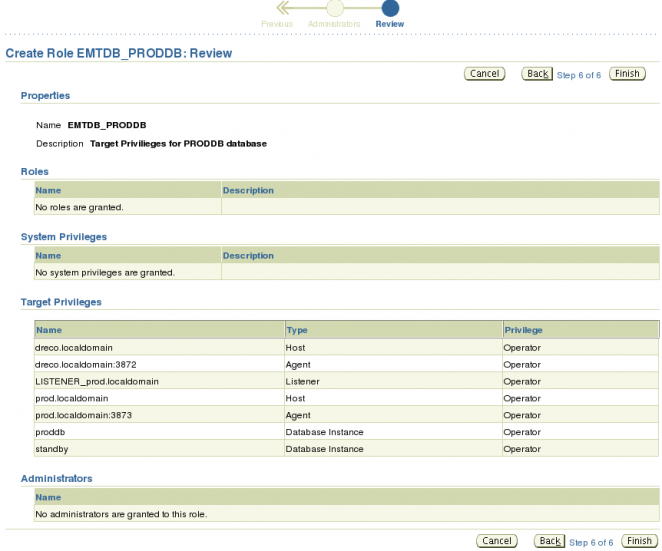
On the Review page we can see all of the choices we have to create this role. If you have need to make changes click the Back button go back to the pages that need to be changed otherwise, click the Finish button to create this role.
Creating an Administrator
As stated in the beginning of this document, in Enterprise Manager 11g Grid Control Administrators are the concept of the user. Enterprise Manager users are Administrators. They are Configuration Administrators, Monitoring Administrators, Server Administrators and just about any other type Administrator in the Enterprise. By now you should understand that an Administrator is defined by the privileges and roles in which it is assigned.
In Oracle Enterprise Manager Grid Control there are three administrator access categories: Repository Owner, Super Administrator, and Administrator.
The Repository Owner is the administrator for the Management repository. This user cannot be modified, duplicated or deleted. The SYSMAN user is the Repository Owner and a Super Administrator.
A Super Administrator has full access to targets and all administrator accounts in Enterprise Manager. Super Administrators can create/modify/delete other administrator accounts including Super Administrators (with the exception of the Repository Owner). Because of the powerful access granted to Super Administrators it is highly recommended that the number of these administrators be limited.
The Administrator is the lowest administrator account in Enterprise Manager and should make up the majority of your administrators. Administrators cannot create/modify/delete other administrator accounts.
All that is left to do now is to create the administrator the proddb database. If you are not already still in the Setup pages click the Setup link in the upper right of the page above the tabs. On the Setup page click the Administrators link in the menu on the left.
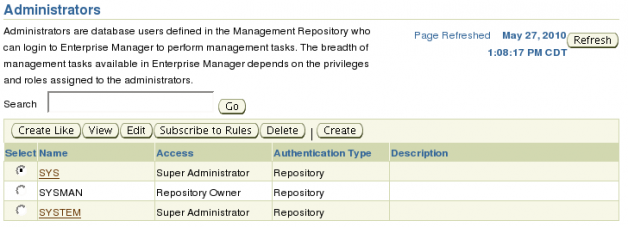
On the Administrators page you will see that there are three administrators. Two Super Administrators (SYS, SYSTEM) and one Repository Owner (SYSMAN) but no normal administrators.
Click the Create button to start the process to create a new administrator.
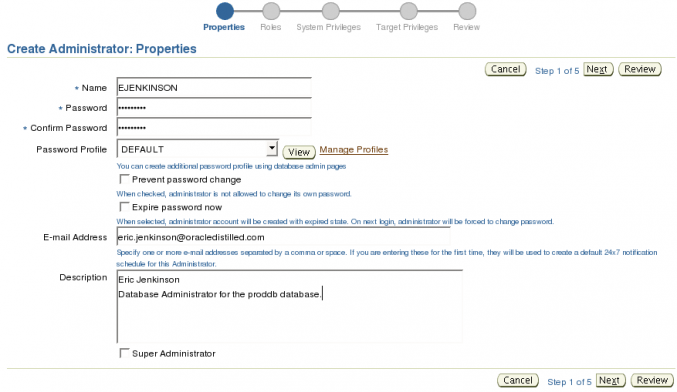
On the Properties page only the Name and Password fields are required. For the password you can choose the password profile to use DEFAULT, MGMT_ADMIN_USER_PROFILE, and MONITORING_PROFILE. You can also force the user to change the password on first log in by selecting Expire password now. You can also make this administrator a Super Administrator by selecting the Super Administrator check box. After you have filled in the fields click the Next button to continue to the Roles page.
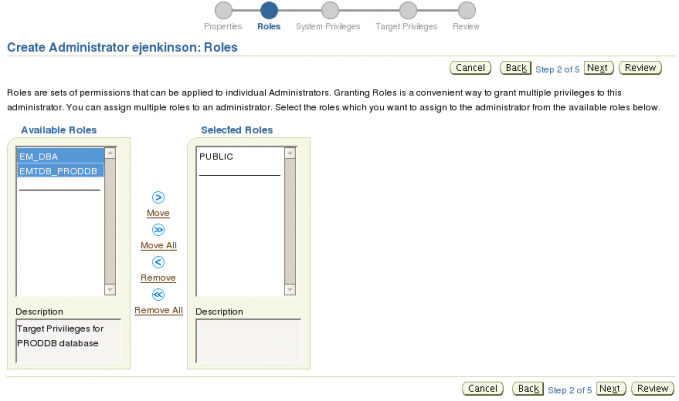
Here is where making roles pays off. All we need to do for this administrator is assign the EM_DBA and EMTDB_PRODDB roles. Select the roles and click the Move link.
Since the roles we have assigned already have the proper system and target privileges all we need to do now is click the Review button to go to the Review page.
The Review details all of the choices we have made up to now. If you have a need to make changes click the Back button otherwise click the Finish button to continue.
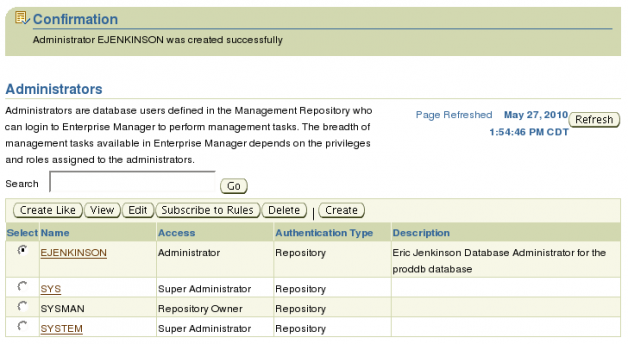
Back on the Administrators page we see that the administrator ejenkinson was created as a regular administrator.
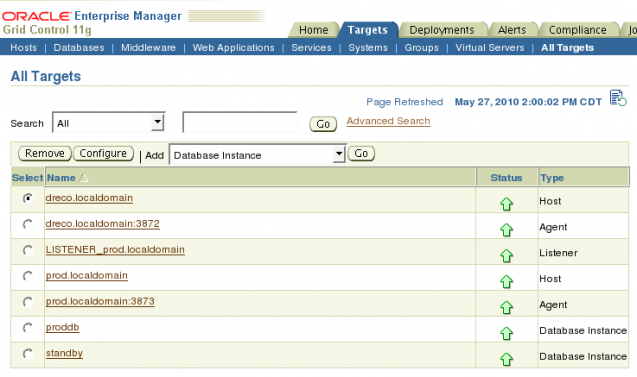
If you login to Oracle Enterprise Manager 11gR1 Grid Control using this user you will have access to only the targets in which privileges were explicitly set. You can verify by looking at the Targets Page with All Targets selected.
Hopefully this document has enlightened you to how Privileges and Roles can be used to create Administrators in your Enterprise Manager environment. Now you should be able to create administrators that have access to only what they need to perform their jobs.







Great artical and simple to understand. Thanks a lot.
Very helpful. 🙂
Great, Post. Thanks for sharing.