Using Database Control you can configure RMAN to back up you database to disk or tape with relative ease. This document will detail how to configure RMAN for disk based backups and perform a backup.
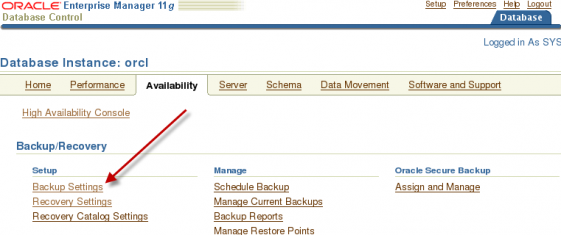
From the Database home page click the Availability menu link.
On the Availability page, click the Backup Settings link of the Setup section under Backup/Recovery.
The Backup Settings page has three tabs: Device, Backup Set and Policy.
We will start first with the Device tab. The Device tab is broken into two sections: Disk Settings, Tape Settings. The Host Credentials section is at the bottom all tabs in the backup settings. This document will demonstrate a disk based backup.
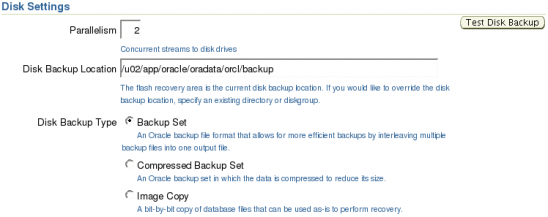
For backing up to disk you can set the Parallelism, Location and Backup Type.
Parallelism – Specifies the number of channels to allocate for the specified device. The default value is 1.
Disk Backup Location – If you have a specific location in which you want backup files placed you can enter that location here. Otherwise the backup location defaults to the Flash Recovery Area.
Disk Backup Type
Backup Set – A backup set is a one or more binary files. A backup set is an RMAN specific file that can contain data from one or more datafiles, archive logs, control files or SPFILE.
Compressed Backup Set – Same as the backup set above but compressed.
Image Copy – Exact copies of the datafile, archive log, control or SPFILE. These are not created in an RMAN specific format.
For this example I have set the Parallelism to 2, provided /u02/app/oracle/oradata/orcl/backup as the Disk Backup Location and selected Backup Set for the Disk Backup Type.
Scroll down to the bottom of the page and enter credentials for an OS user that can access host in which the database is hosted on.
After entering the OS credentials click the Test Disk Backup to verify Oracle can access the backup location.
It will take a few moments for the test to complete. Once the test completes you will be returned to the Backup Settings page and you should see message that the test was successful.
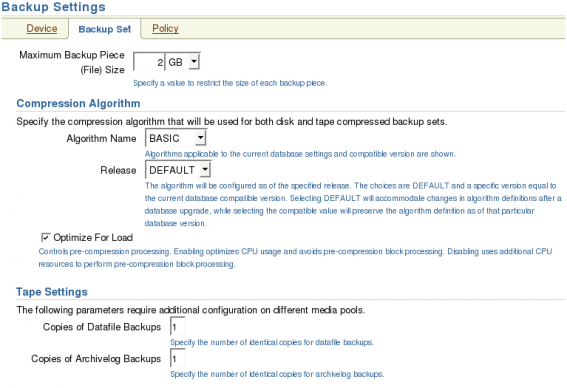
After the test is completed click on the Backup Set tab to configure settings for the Backup Set.
On the Backup Set tab you can set the maximum file size for backup piece. A backup set can have one or more backup pieced depending on the size of the database and size set for the maximum backup piece size. You can all configure the Compression Algorithm. For this tab, I just set the Maximum Backup Piece to 2GB. Click the Policy tab to continue.
The Policy page is split into three sections: Backup Policy, Retention Policy and Archive Redo Log Deletion Policy.On the Backup Set tab you can set the maximum file size for backup piece. A backup set can have one or more backup pieced depending on the size of the database and size set for the maximum backup piece size. You can all configure the Compression Algorithm. For this tab, I just set the Maximum Backup Piece to 2GB. Click the Policy tab to continue.
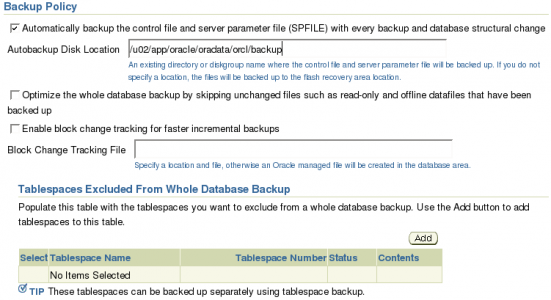
The Policy page is split into three sections: Backup Policy, Retention Policy and Archive Redo Log Deletion Policy.
In the Backup Policy section you can enable block change tracking to improve incremental backups, exclude tablespaces of your choice from full backups as well as have RMAN skip files such as read-only and offline datafiles.
For this example we are setting the Backup Policy to automatically backup the control file and SPFILE with every backup and structural change. What this does is insure that a backup is taken of the control file and SPFILE every time an RMAN backup is taken or when the database’s physical structure changes.
In the Retention Policy section you can choose how long you want RMAN to keep the backups. You can choose to keep all backups (delete backups manually), a recovery window (have a rolling window of days), or a set redundancy (rolling number of backups).
One thing to keep in mind is that when you specify a recovery window you are specifying how many days you want to keep not the number of backups, and when you specify a redundancy you are stating how many backups you want to keep not the number of days.
n this example we have set the Redundancy to 3 so we are always going to keep the last three backups regardless of how old they are.
The last section is the policy on Archived Redo Log Deletion. If you are using the flash recovery area you can choose to allow deletion of archive logs to be handled by the retention policy. You also have the option deleting the archive logs after they have been backed up a specific number of times. For this section we have selected to delete the archive logs after they have been backed up one time.
After making changes click the OK button for the setting be changed.
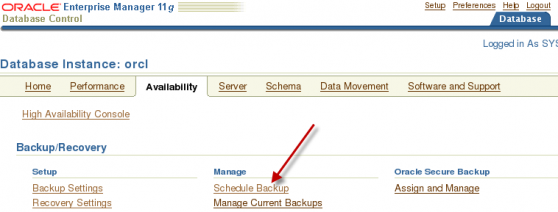
Once the changes are made you will be returned to the Availability tab. Now that we have the backup settings configured we will now perform a backup. On the Availability click the Schedule Backup link under Manage in the Backup/Recovery section.
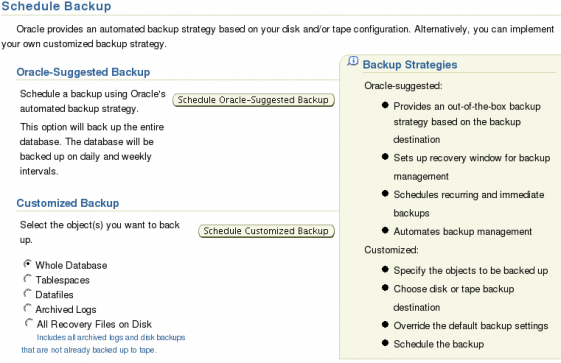
The Schedule Backup page allows you to schedule a backup using either Oracle’s recommend backup strategy or a custom backup. For this document we are going to select the Whole Database under the Customized Backup. Select Whole Database and click the Schedule Customized Backup button.
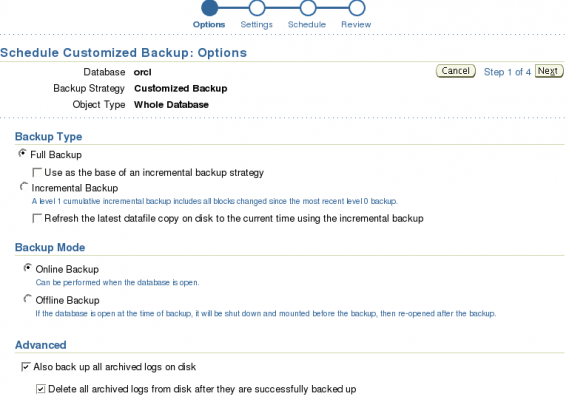
The Options page allows you to do a full backup or incremental backup. The backup can be online (hot) or offline (cold) backup. You can choose how archive logs will be handled and encryption if needed. For this example we are going to do an online full backup. We are going to backup the archive logs and delete them from disk.
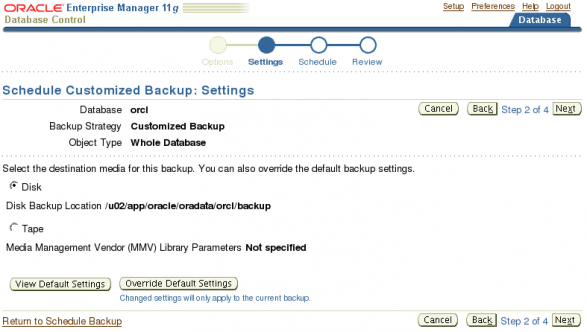
Clicking the Next button brings us to the Settings page. On this page you can choose to override the settings we previously configured. Make no changes on this page and click the Next button.
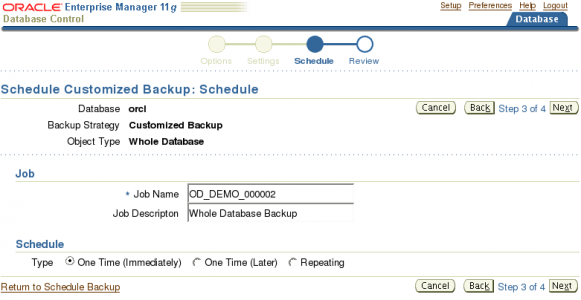
The Schedule page allows you give the backup job a name along with the schedule. You can schedule this backup to take place immediately, One Time (later) and Repeating. For this example we are to run this One Time (Immediately). Click the Next button to continue.
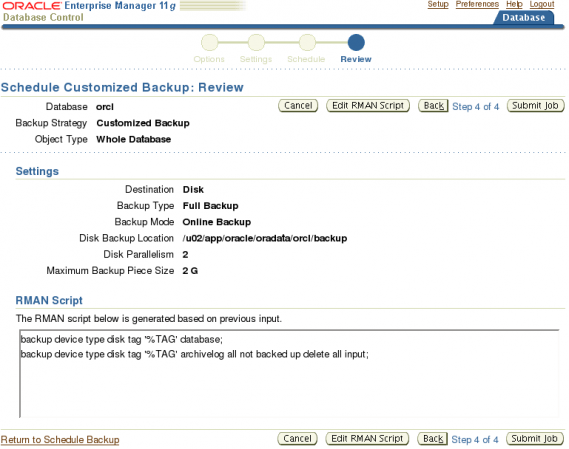
The last page is the Review page. On this page you can review job before submitting. You can look at the RMAN script to be executed by this job. If you need to edit the script for any reason you can click the Edit RMAN Script. Click the Submit Job button to continue.
This next page tells us that the job was successfully submitted. You can view the job status by clicking the View Job button.
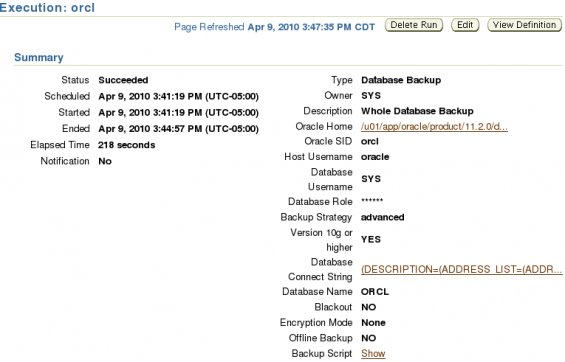
The Job View page provide summary and status about the job. Here we see that the job succeeded and took 218 seconds to complete
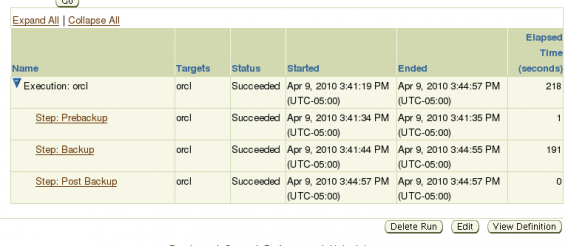
Below the summary information is step by step break down. For the back up there were three steps. Each step is link to more detailed information about the step.
We have just seen how easy it is to configure RMAN and to take a backup with Database Control. There is much more to a successful backup up strategy than what was detailed in the document. I encourage you to seek further information on RMAN and backup and recovery in the Oracle Documentation.








Heck yeah this is exltacy what I needed.