With Oracle VirtualBox 4.1 cloning a VM is now available from the user interface making the process much simpler. In prior releases cloning a VM was a multi step process in which you needed to use the command line utility VBoxManage clonehd to create a clone of the virtual device and then attach that new image to new virtual machine.
You also had to know the OS and whether it was 32bit or 64bit machine when creating the new VM. The new method for cloning a VM is much simpler and less error prone. This document was created using Oracle VirtualBox 4.1.0 r73009 on a Mac OSX 10.6.8 host machine.
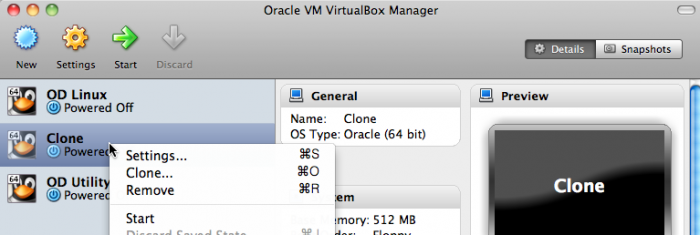
Right click on the machine to clone and select Clone…
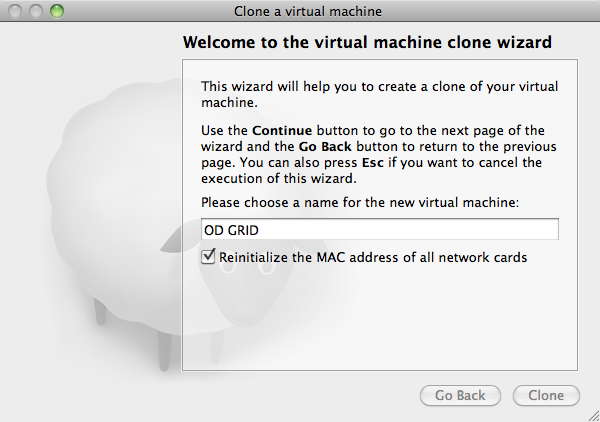
On the Clone a Virtual Machine dialog enter the name for the new machine. The process will capture all of the configuration information of the VM such as OS, whether the machine is 32bit or 64bit and all memory settings.
Because the clone process does copy the all of the VM information you can choose reinitialize the MAC address of the network card on the new VM. Provide a name for the new machine and click the Clone button to continue.
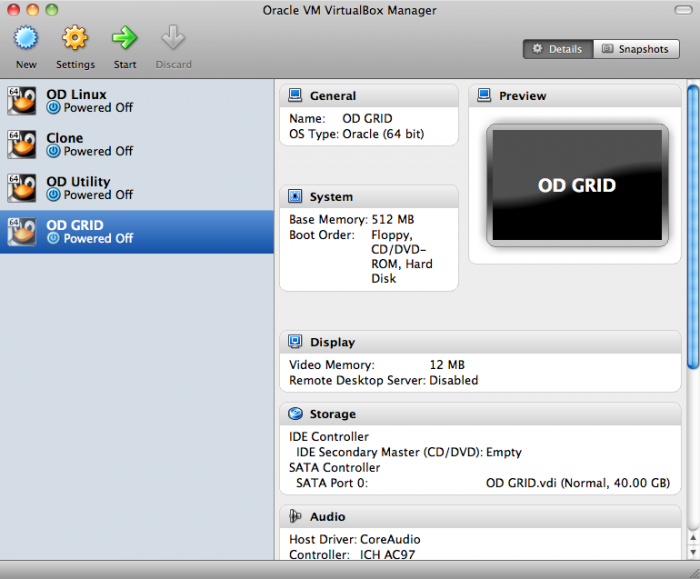
The longest part of the clone process is the cloning of the virtual disk. Once the clone of the disk is complete you will be taken back to the Oracle VM VirtualBox Manager screen and the cloned VM will be listed.
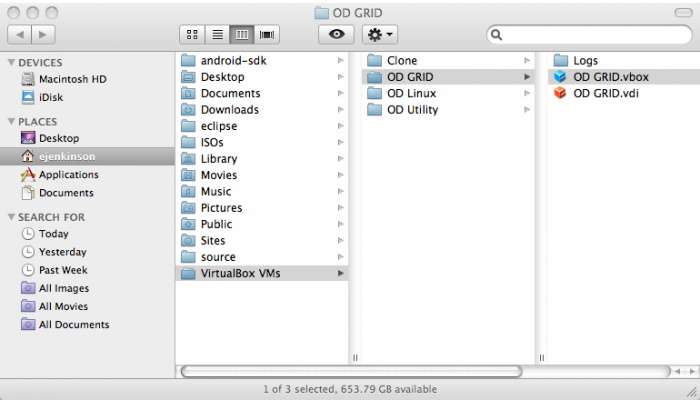
The clone operation created a complete file structure under the same directory path as the existing VM.
In just a few mouse clicks we now have successfully cloned a VM along with the storage. Being able to clone the complete VM via the UI is welcome addition and well worth the upgrade to 4.1


I get an error: Failed to clone the virtual machine …
Cannot register the image ‘c: ….\VBoxGuestAdditions.iso’ with UUID …
because a ‘c: ….\VBoxGuestAdditions.iso’ with UUID … already exists
Hello Richard,
It looks like you have the VBoxGuestAdditions.iso mounted on the machine you are trying to clone. Try unmounting or ejecting the ISO from the VM and try your clone again.
Eric Jenkinson
I have same problem. Ejected drive, unmounted drive, uninstalled additions, deleted all references I could find to VBoxGuestAdditions.iso and still the same message. I even did a registry search.
Looks like a bug.
Result Code:
VBOX_E_INVALID_OBJECT_STATE (0x80BB0007)
Component:
VirtualBox
Interface:
IVirtualBox {c28be65f-1a8f-43b4-81f1-eb60cb516e66}
Workaround as follows (on Windows).
Open command line prompt and type in / copy and paste all on one line:
“c:\program files\oracle\virtualboxvboxmanage” clonevdi “c:\path to existing .vdi” “c:\path to new .vdi”
Then, once that is finished (0%…10%…etc.) open the VirtualBox Manager and click “New”, enter the new name, and follow options as necessary until you reach the “Virtual Hard Disk” section.
In here, select “Use existing hard disk” and then browse to the NEW .vdi file.
The system will then create a new VM using the cloned VDI.
Hello Mikey,
I have not been able to replicate your problem so I would like to ask some questions for clarification. Do you have this problem with all VMs that you attempt to clone or just particular ones? It looks like your host OS is Windows, what is the guest OS on the VM you are attempting to clone?
The drives attached to a machine are listed under the Storage section in VirtualBox Manager and in the storage section of the VM’s settings screen. Is the VBoxGuestAdditions.iso listed on either screen? If so that could be the problem. In the case that the iso is not listed take a look at the XML file for the VM located in Drive:\path\VirtualBox VMS\< VM Name >\< VM Name >.vbox. Below is a section of one of mine.
<?xml version="1.0"?>
<!--
** DO NOT EDIT THIS FILE.
** If you make changes to this file while any VirtualBox related application
** is running, your changes will be overwritten later, without taking effect.
** Use VBoxManage or the VirtualBox Manager GUI to make changes.
-->
<VirtualBox xmlns="http://www.innotek.de/VirtualBox-settings" version="1.12-windows">
  <Machine uuid="{08251541-2d9e-4a7f-94e0-5d010f839a39}" name="OD RAC1" OSType="Oracle_64" snapshotFolder="Snapshots" lastStateChange="2011-08-04T16:11:22Z">
    <MediaRegistry>
      <HardDisks>
        <HardDisk uuid="{2221b799-a337-401c-95b5-ed8a17879c46}" location="OD RAC1.vdi" format="VDI" type="Normal"/>
      </HardDisks>
      <DVDImages>
        <Image uuid="{c6a207df-f251-4c78-80ef-77711e8d44f2}" location="C:/Program Files/Oracle/VirtualBox/VBoxGuestAdditions.iso"/>
        <Image uuid="{5a0c8361-2e11-4e49-9d56-d6dde93345eb}" location="C:/Users/ejenkinson/isos/Enterprise-R5-U6-Server-x86_64-dvd.iso"/>
      </DVDImages>
      <FloppyImages/>
    </MediaRegistry>
Verify that the iso is not listed under the MediaRegistry tag.
Thank you visiting Oracle Distilled and sharing your experiences.
Eric Jenkinson
I was having the same problem. I was able to fix it by first creating a new virtual machine using the existing vdi and then cloning the new machine using the graphical clone utility.
Well, I fix it by deleting the VBoxGuestAdditions.iso entry in the tag of the .vbox file.
Yes, replacing the whole Tag … VBoxGuestAdditions.iso … with in the “.vbox” did it!
Thanks for the tip!
Thanks, I had the same issue and fixed it removing the image from the .vbox file.
You should also be able to release and delete the ISO from the “Virtual Media Manager” (Under File… menu in VirtualBox Manager)